
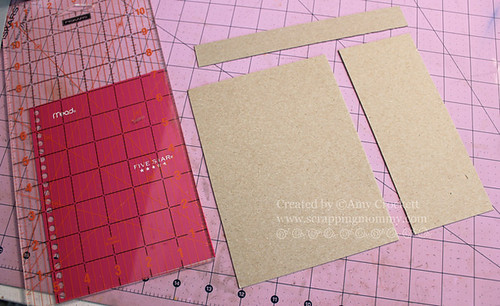
First thing you need to do is to remove the spiral binding. You do this by using a pair of round nosed pliers and carefully bend the wire at both ends so that you can twist it off. Be careful to keep all the papers together so that you don't have to try and get all the holes to line up at the end. Set the papers and back cover aside.

Next, you want to measure the front cover. I usually replace the notebook cover because lately I can only find them in plastic and the papers don't stick too well to them. I have a huge stack of chipboard that I bought at some clearance center that I use. Don't toss the front cover, you need it as a template. I measure the original cover and then use a heavy duty paper trimmer to trim the new front cover to fit exactly.
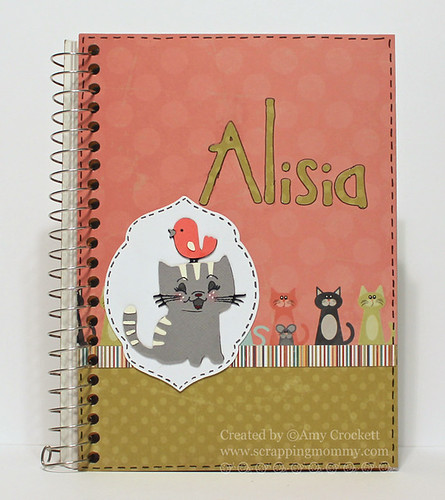
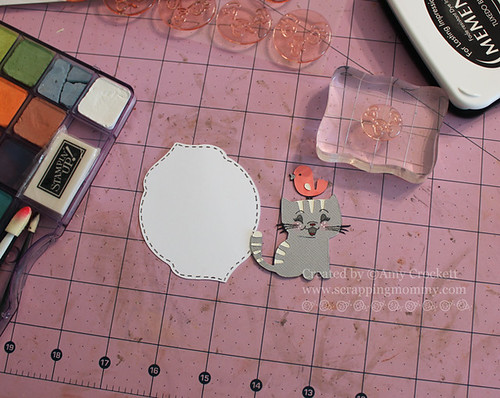
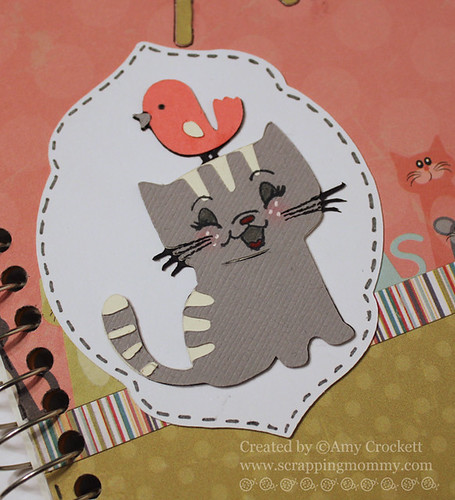
I then cut out my cute little kitty with my Cricut and the Meow Lite cartridge. I used the new Here Kitty Kitty Face Assortment from Peachy Keen Stamps to add an adorable face to my kitty. I then used a pen and chalk to add some details to the face. The label that I have the kitty on is from Elegant Edges. I added some pen stitching to it.
I then added some fun patterned paper to the front cover (with the same measurements that I had when I cut the chipboard cover. I add a little pen stitching around the edges of that as well.

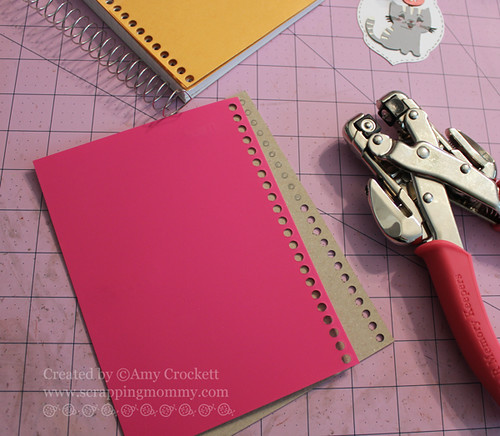
Now take your original cover and use it as a template to make the holes in the left side of the front cover. I used a pencil to outline all the holes and then punched them out with a good hole punch.
All that is left is to re-assemble the notebook and add a name to the front. I chose my daughter because she loves notebooks and kitties, so this is the best of both worlds for her. I can't wait to give it to her.
Here is a close up of that adorable little kitty face......so darn cute!!
Thanks for stopping by!! Don't forget that there is an amazing sale going on over at the Peachy Keen Stamps website through tomorrow.......hurry over before it ends!!

Hugs,
Amy
This is so cute...I've never thought of doing this! Lee-Ann :)
ReplyDeleteBeautiful! I've been wanting to do this, but am rather shaky I would ruin the binding wire. Did you reuse the same one?
ReplyDeleteAmy, this is a adorable! I'm so impressed that you got that wire off! Great idea!!!
ReplyDeleteWhat a Fabulous Notebook!I love it!I worried about removing the wiring on the notebooks but you made it so easy.TFS
ReplyDeletehttp://craftingwithcreativem.blogspot.com
What a terrific idea. This turned out FABULOUS and OH so cute!!!! Hugs- Glora
ReplyDeleteVery cool!!! I just made a notebook today ;-) Thanks for sharing!
ReplyDeleteI love the way you did this altering. It turned out great. Love the kitty with the bird on his head and Peachy Face! Great job!
ReplyDeletequilt 4 fun 2 at hot mail dot com
Do your ideas never end? And this is so adorable. Some more ideas for children. Thanks for sharing.
ReplyDeleteAww Amy! you did a wonderful job! I love notebooks too, thanks for the inspiration!
ReplyDeleteLoly Borda
AWESOME job with your sweet notebook!TOO CUTE:)
ReplyDeleteThis is a real cutie, TFS :) ♥
ReplyDeleteReally cute Amy...is there some reason you can't pin to Pintrest from your blog?
ReplyDeleteI have such a crappy memory and it makes it easier to find ideas if I "pin" them!
WOW!! this is a cool idea
ReplyDeleterosiemini@gmail.com
www.scraplovingminis.blogspot.com
How cleaver! I make these also but I search for the notebooks with a different type of binding wire. The ones similar to a bind it all. Those you can gently spread apart to remove the front and back covers while leaving the paper. Then put them back on and gently squeeze the binding back together.I have found these at the Dollar tree. I
ReplyDeleteWhat a super cool idea!! I can't wait to try this!! So cute!! Thanks for the tutorial!!
ReplyDeleteTFS!! Take Care!!
Jennie @ http://earthyscrap.blogspot.com/
Amy ~ ADORABLE! Just to cUTE and CLEVER to take that cover off and make it your own! I have some old scrapbook things I wanted to change the cover and never knew how! YOu totally helped me out ~ THANK YOU!!! I am going to have to try this! LOVE it!
ReplyDelete