Monday, May 30, 2011

SRM Stickers With Bazzill

Today on the SRM Stickers blog, we get to feature Grandma's Feather Bed From Bazzill.  How fun to pair these two yummy products together.  Bazzill isn't just cardstock anymore.....there are lots of goodies now available like pattern papers, buttons, flowers, beads, and other fun embellishments that coordinate with their fab cardstock that we have all grown to love.  Here is my project that is also being shared over on the SRM Stickers blog today.


The pattern paper, cardstock, buttons, and beads (tube) are all from Bazzill.  I have paired them with the awesome We've Got Your Sticker - Thanks from SRM Stickers, a stamp from Unity, and the tube is filled with yummy Rolo candy.  I also cut the large tag on the tube with my Cricut and the Once Upon A Princess cartridge.....the small tag is a Stampin' Up! punch.

If you get a chance, hop on over to the SRM Stickers blog and see what other fab projects the rest of the DT has been working on.....there will be lots of eye candy from Bazzill and SRM Stickers for three days (if you leave comments on those three days, you could win something  ::wink::  ::wink::).

Hugs,

Sunday, May 29, 2011

Hello Friend - Moxie Fab Style

Hello to all my friends out there in blog land.  Today I am going to share a really quick card with you that I was inspired to make from this weeks Tuesday Trigger - The Pyrex Effect at Moxie Fab World.  By really quick card, I mean that I threw this baby together from start to finish in less than 20 minutes.....probably one of the quickest cards I have made in a long time.


Here is the Tuesday Trigger photo my card was inspired by:

Just look at all of that yummy orange color.  I remember my grandmother having a set of bowls exactly like this when I was a kid, so I just had to make a card based on this photo.  So, what do you think?? 

Thanks for stopping by and for your lovely comments.

Hugs,


      Supplies:
        Cardstock, ink, ribbon: Stampin' Up!
        Stamps: Taylored Expressions
        Sticker: SRM Stickers
        Embossing: Cuttlebug
        Pen: Zig
        Other: button, embroidery floss

Friday, May 27, 2011

Aloha Shadowbox Frame

Aloha everyone!!  I have gone back to the time my grandmother and I took a trip to Hawaii several years ago with this project.  This frame was so fun to put together and the Luau limited edition cartridge from ScrapbookPal.com was a perfect fit for the pictures I put in here.

Supplies needed:
 - Shadow Box Frame (I got mine when I did a trade of crafting supplies
        with friends earlier this spring)
 - Spray paint
 - Cricut
 - Luau limited edition cartridge
 - Patterned paper (I used Making Memories....it came in a kit with flowers and stickers)
 - Cardstock in various colors to match your patterned paper (mine is Stampin' Up!)
 - Colorbox Fluid Chalk
 - Stickles Glitter Glue


Let's get started:
  • Spray paint your shadow box to the color you desire.
  • Layout your papers and pictures and figure out where you want to place your images/pictures.
  • Measure the boxes on your shadow box and cut patterned paper so that it will fit inside.  Using Colorbox Fluid Chalk, ink the edges of your patterned paper.  Adhere the paper to the shadow box
  • Cut your photos to fit in the slots that you plan to put them in and adhere them.
  • Pick your images on the Luau limited edition cartridge that you want to cut and cut them out with your Cricut.  Ink the edges of all pieces with some Colorbox Fluid Chalk and adhere the layers together.  Adhere the to your shadow box with dimensional foam adhesive....you can stack two or more of the dimensional foam pieces together to give it more lift in the shadowbox.  Add some Stickles to the images for a little sparkle.
  • Add additional embellishments as desired (I used some of the stickers and one of the flowers from the paper kit)


**Tip**
     Trading supplies with friends is a perfect way to refresh your own supplies.  Sometimes when my friends and I get together, we bring supplies that we don't want anymore and take home *new to us* supplies that our friends didn't want anymore.....that is how I ended up with this shadowbox frame.  I wanted to have some larger slots in my shadow box, and so I was able to alter a couple of spaces by very carefully removing slats with a sharp blade so that I could fit the pictures I wanted to into it.

I hope you have a fun and crafty weekend!!

Hugs,

Wednesday, May 25, 2011

Denim Gluber Flower

Have you seen the Glubers from Cosmo Cricket yet??  They are great for making the fun rolled flowers like the on on my card below.  You can see a video about them and how to use them HERE. I used an old pair of my husband denim jeans for the material and some rhinestones to accent it for the CAS-ual Friday's Bring the Bling Challenge.
      Supplies:
        Cardstock: Stampin' Up!
        Patterned paper, gluber: Cosmo Cricket
        Sticker: SRM Stickers
        Rhinestones: Imaginisce (smaller), Karen Foster (larger brads)
        Other: button, hemp twine

I hope that you are having a fabulous week!!

Hugs,

Monday, May 23, 2011

Hip Hip Hooray!! A New Card on Monday!!

Here is a fun card for any of the little kids in your life.  This card is for the shaped card challenge going on at this week at My Craft Spot.  I used my gypsy to weld two of these hippos from Creat A Critter together (mirror image of each other) and then cut another one to put on top of the card with the layers.  I added some stickles for a little sparkle and then the tag is stamped with a sentiment from My Craft Spot, along with some of her crickled ribbon and topped off with a button. I also added some fun googley eyes and doodled some stitching.

      Supplies:
        Cardstock: Bazzill, Stampin' Up!, The Paper Company
        Die cuts: Cricut with Gypsy and Creat A Critter cartridge
        Stamps: My Craft Spot
        Ribbon: My Craft Spot
        Glitter: Stickles
        Ink and pen: Stampin' Up!
        Other: google eyes, button

I hope that you will hop on over to My Craft Spot to see the awesome prize up for grabs and also to join us in this fun challenge.
Hugs,

Sunday, May 22, 2011

Flashback Friday 11.0

How has your weekend been??  I have been purging and organizing my scrapping room as well as the rest of my house in hopes that if I do enough spring cleaning, spring will actually decide to show up around here.  ;)

I did want to share this card with you that I am re-posting for the Flashback Friday Challenge 11.0 which is to re-post your first wedding card.  This is a wedding card that I created for my cousin and his wife back in January 2010.  This is the first wedding card that I made and actually took a picture of (there were a couple others that I made long ago, but I didn't get pics taken of them before I gave them away).  I love playing along at Flashback Friday.....how fun to go back into the archives and find jewels like this one that I get to share with you all over again.....


You can see all the details of this card and what challenge I completed it for HERE.  Also, don't forget to try out the lovely sketch my daughter did for a chance to win a prize HERE.

Hugs,

Saturday, May 21, 2011

Lisi's Sketch + 2 Cards

Hello to my lovely friends out there in blog land.  I have a sweet and talented little 7 year old girl that lives with me.  She has seen mommy drawing up sketches and making cards and so she has decided that she wanted to make a sketch and matching card, too. 

She wants to invite all of you and your kids to create a card with the sketch below and share it with us here.  After two weeks, we will go through all of the entries and select our favorites to show on my blog along with a randomly drawn winner from all entries to win a prize.  I am excited to share her sketch and card with you.
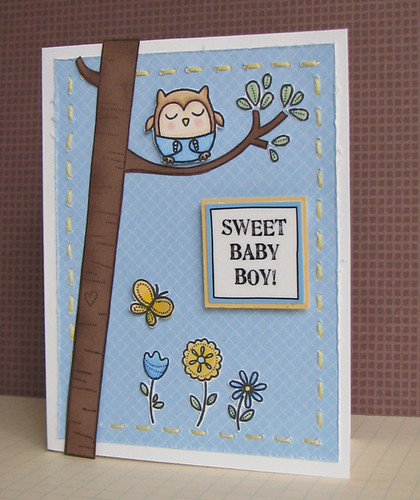
Her sketch:
and her card:


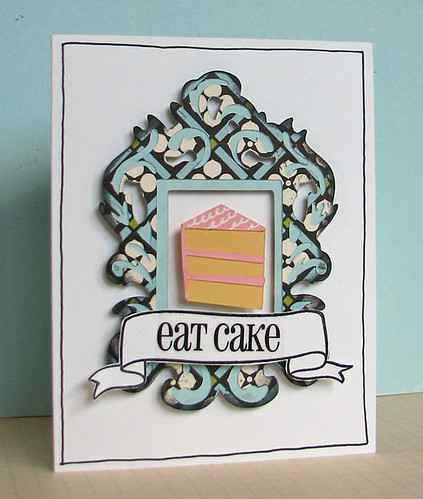
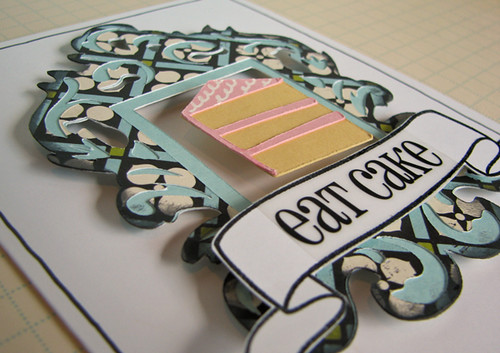
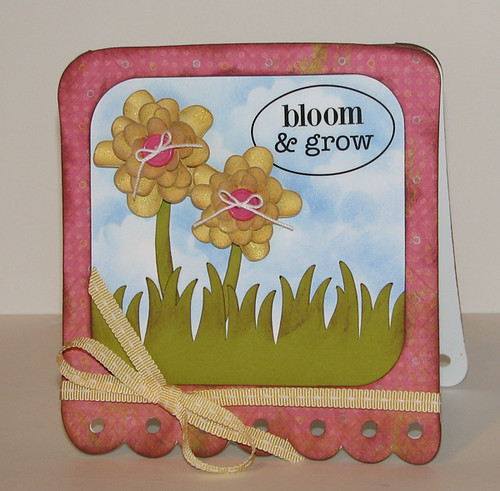
I was also inspired to create a card with her lovely sketch along with inspiration from PDCC82 and Little Red Wagon's Tree Challenge
      Supplies:
        Cardstock, patterned paper: Stampin' Up!
        Stamps: My Cute Stamps
        Sticker: SRM Stickers
        Markers: Copic
        Ink: Memento
        Other: embroidery floss

Here is the prize for Lisi's Sketch Challenge:


I sure hope that you will play along with us.......Be sure to link directly to the post that has your card or directly to the project in your gallery instead of a general link so that we can leave come and leave comments.  Also, if you can, please link back to my blog from your post so that others can play along......that would be awesome.  You can create and link more than one card, but it must be a new......please, don't link to older projects.  You have until June 4th to enter.


If all goes well and we have enough participants, I may make sketches with prizes a regular thing on my blog.  What do you think?? 

We can't wait to see what you create!!

~HUGS~
  And LISI

Eat Cake! Card

Finally, a day without rain and the sun is shining.  In the area that we live in there has been quite a bit of rain and still lots of snow (with more being added almost daily) in the mountains, there has been flooding in towns near us, with the high chance of more flooding in the near future.  Thankfully, we live high up out of a wash, so there really isn't much chance for flooding in our home (unless you count the time that our washing machine failed while filling and flooded the house a  few years ago).    I just had to go and get shot of the view from my scrapping room window.....
YAY BLUE SKY PEEKING THROUGH!!

Things are looking up on the home front....my lovely husband has found a permanent full time job that he starts on Monday.  WooHoo!!  I am also almost ready to shoot pics of my scrapping room to share with you on here.  I have had design team commitments that have kept me from being able to finish up on getting things organized and pictures taken.  Hopefully I will be ahead of the game in the next couple of weeks to shoot some pics and share them all here.

Today I am going to share a card that I created with the sketch at Lily Pad Cards that was sketched by my lovely past fellow DT member of Caardvarks, Lucy Abrams.  I also used a stamp from the sponsor, Lawn Fawn, on this card....it is called Bannerific.  This card was inspired by the Moxie Fab World Tuesday Trigger - Some Royal Fun.


I popped the images up off the card with dimensional adhesive....for the cake, I stacked two of the dimensional adhesives together to give it more height than the frame.
      Supplies:
        Cardstock: Stampin' Up!
        Patterned paper: Making Memories
        Die cuts: Cricut with Sentimentals and From My Kitchen carts
        Sticker: SRM Stickers
        Stamp: Lawn Fawn
        Pen: Zig
        Ink: Colorbox Fluid Chalk

Thanks for visiting!!

~HUGS~

Thursday, May 19, 2011

A Country Thank You - For the Reject Pile

I haven't had too many projects published....my first time was in the first edition of the Cricut Magazine and I have a couple of projects going into the Birthday Idea Book.  I was totally elated to have any of my work published in a magazine.  To be published, you need to submit, submit, and submit some more.  Not all of the projects you submit will be picked up for publication and here is one of mine.  Now, don't get me wrong...I ♥ this card and was really hoping it was going to be picked up....so it really isn't going into a literal reject pile.  The call was for the August or September edition of the Cricut Magazine and they were looking for cards created with the Freshly Picked cartridge.  I used that cartridge to cut the overalls on this card.
      Supplies:
        Cardstock: Stampin' Up! (kraft, cream, pink), Coredinations (blue)
        Die cuts: Cricut with Freshly Picked cartridge
        Ribbon: Stampin' Up!
        Stamp: Stampin' Up!
        Flowers: Prima
        Embossing: Cuttlebug with Heritage embossing folders
        Lace: Offray
        Ink: Stampin' Up!
        Brads: Making Memories
        Other: hemp twine

Tell me, have you submitted any of your creations to a magazine yet??  Which magazines??  Where any of your projects picked up for publication??  Please share.....I would even love to see your rejected projects....

~HUGS~

Monday, May 16, 2011

May Projects with Apron Strings Designs

I had the chance to work with the May Bigger Than a Breadbox kit from Apron Strings Designs.  There are fab papers in there from Lily Bee and Bella Blvd.  Here are all the projects that I created with this kit:

Lily Bee:
(Layout done with Sketch Inspirations #220)

(Layout done with PageMaps sketch included with the kit)


Here are the projects from the Bella Blvd line:


If you would like to get your hands on this wonderful collection, hop on over to Apron Strings Designs or CLICK HERE to go directly to the Bigger Than a Breadbox page so you can check out all the yummy goodies that are included in this kit.

~HUGS~

Wednesday, May 11, 2011

Shine Your Light Card with A New Sketch


Today I am going to share a CAS (Clean And Simple) card with you that I created with the Luau Limited Edition Cartridge from ScrapbookPal.com  This card was pretty easy to make and put together, let's get started.

Supplies needed:
 - Cricut machine
 - Luau Limited Edition cartridge
 - Cardstock in desired colors (I just used scraps)
 - black pen
 - sentiment (mine is from SRM Stickers)
 - hemp twine

Here is how to re-create this card:
  • Cut a white card base to the size of 8 1/2 x 5 1/2 inches, then score and fold in half to make an A2 sized card (4 1/4 x 5 1/2 inches).
  • Draw a single line along the outside edges of the front of the card with a black pen.
  • Using your Cricut machine and the Luau Limited Edition cartridge, cut out the lanterns at 2 inches.  Cut the different colors for the top layer of the lanterns, if desired.  I also cut out an extra layer in yellow and cut the lantern parts off to layer between the base and top lantern layers to give it more color.  Adhere the layers together
  • Outline the lanterns with the black pen and then adhere the lanterns to the top middle area of the card with dimensional adhesive.
  • Tie little bows with the hemp twine and adhere with a little dab of glue to the ends of the lantern string.
  • Add a sentiment to the bottom of the card.
I thought that this would also be a image to use for a summer time party or luau invitation. There are so many fun ways to use this cut. I hope that you have been inspired to try out the lantern cut for yourself.
Here is a new sketch that I created for this card. I would love to see how you use it....please leave a link in the comments below so that I can come and see and leave some love on your blog.  I am thinking of having some sketch challenges on my blog.  Let me know if it is something that you would be interested in.  Even my daughter has a sketch that she wants you all to try out that I will post later this week......there will be a prize, too.

~HUGS~

Monday, May 9, 2011

Die Cuts + SRM Stickers = Perfection

Today on the SRM Stickers Blog, they are featuring their stickers with die cuts for fabulous cards.  Here is the card I created with die cuts and SRM Stickers


The sticker is from SRM Stickers.  The shape of the card is cut out with my Cricut and the Gypsy Wanderings (on the Gypsy), the flowers are from the Paisley cartridge, and the grass is cut from Straight From The Nest.  I created the sky background myself with a scallop shape, ink and a sponge dauber on white cardstock.  I will have to do a tutorial on how I make that so that you can all try it yourself.  It is really easy and I love the results.

I am also using this card for My Pink Stamper's Challenge #8.  Thanks for stopping by!!

~HUGS~

Bling It Up Birthday Card - My Craft Spot

Good morning!!  Today there is a new challenge at My Craft Spot and the challenge is to use bling on a project.  I created this card with the Birthday Bash cartridge and the Inside and Out Stamp set #1 from My Craft spot.

I added some stickles to the frosting and candle of the cake.

I even added some bling to the inside of the card on the candle flame......
      Supplies-
        Cardstock, ink: Stampin' Up!
        Die cuts: Cricut with Birthday Bash cartridge
        Stamps and ribbon: My Craft Spot
        Embossing: Cuttlebug with Quickuz embossing folder
        Glitter: Stickles
        Rhinestones: Michaels
        Pen: Sakura Gelly Roll
        Other: Button, embroidery floss

Hop on over to My Craft Spot to see what the other designers have to share and come and join us to have a chance to win a fab prize.

~HUGS~

Sunday, May 8, 2011

Happy Mother's Day!!

I would like to wish all you moms, grandmothers, soon-to-be moms, and *bonus moms (I like this better than step mom) out there a Happy Mother's Day!!  I have been all of the above at one point or another on Mother's Day. For today, I would like to share this card with you that I created with the May Bigger Than A Breadbox kit from Apron Strings Designs.  This card has a wonderful sample of the papers available in the kit.

The papers on this card are from Lily Bee Design.  I cut the squares at 1 1/4 inches with my Cricut and George and then adhere them to a base.  I then hand stitched each square with some white crochet thread.  I added the flower (also comes in the May kit) and the sentiement (Stampin' Up!).  I am entering this card into My Pink Stamper's Challenge #4.

I hope that you all have a fabulous day!!  I am off to church and then I am going to spend the rest of the day playing/snuggling with my kids.

~HUGS~

Saturday, May 7, 2011

A Masculine Birthday Card For My Hubby

So, my hubby's birthday was the other day and I generally struggle with birthday cards for him and other adult male relatives.  I have the Camp Out cartridge for my Cricut and it was perfect to use on this card.  My husband is a hiker and a general outdoorsman, so he loved this card.
      Supplies-
        Cardstock: Stampin' Up! (green, tan), Bazzill (dark brown) 
        Patterned paper: Fancy Pants
        Die cuts: Cricut with Camp Out and Stamping cartridges
        Border punch: Fiskars
        Ink: Colorbox Fluid Chalk
        Brads: Stampin' Up!
        Other: embroidery floss, corrugated cardboard, hemp twine

I used sketch 189 at Mojo Monday for my card.  I am also entering this in the My Pink Stamper Challenge #2. Thanks for stopping by!!       

~HUGS~